













Ticket escalation moves a support ticket to someone with more expertise or more authority when the person handling it can't resolve it.
Every support team hits that moment. A customer writes in with a problem your frontline agent can't solve. It could be:
- A technical issue that needs a specialist
- A billing exception that requires manager approval
- The customer is just done waiting
That's when a ticket needs to be escalated, and the way you hand it over decides how long the customer keeps waiting.
The problem? Most teams don't think about their escalation process until something breaks.
An SLA gets blown, or a frustrated customer churns. Sometimes an agent sits on a complex ticket too long because they weren't sure when to pass it along.
This guide covers the types of escalation, a four-step handoff, and how to run it in a Shopify helpdesk. It also covers the metrics to track and the mistakes to avoid.
- Escalation is a built-in tool, not a sign of failure.
When teams treat escalation as failure, agents hold onto tickets too long. Manageable issues then turn into SLA breaches and reputational damage.
- Functional vs hierarchical: getting the type right saves everyone time.
Functional escalation routes to deeper expertise; hierarchical escalation routes to higher authority. Mixing them up sends the ticket to the wrong person first and costs a second handoff.
- Documentation before handoff is non-negotiable.
A vague internal note resets the customer's experience to zero and forces them to repeat themselves. It is one of the most common escalation mistakes.
- Automate the obvious, keep human judgment for the nuanced.
SLA timers and keyword triggers catch clear cases, but an agent five minutes from resolution shouldn't be force-escalated by an automation rule.
- Your escalation data is a diagnostic tool.
Recurring escalation patterns reveal training gaps, documentation holes, and UX problems hiding in your product. Treat them as signals, not just numbers.
What is ticket escalation?
Ticket escalation is the process of transferring a support ticket to a higher level of expertise or authority. It happens when the ticket can't be resolved at its current level. Here's how those levels work and when a ticket should move:
How support tiers work
In most organizations, support operates in tiers:
- Tier 1: Frontline support handling common, repeatable issues
- Tier 2: More technical or specialized support
- Tier 3: Engineering, product, or senior experts
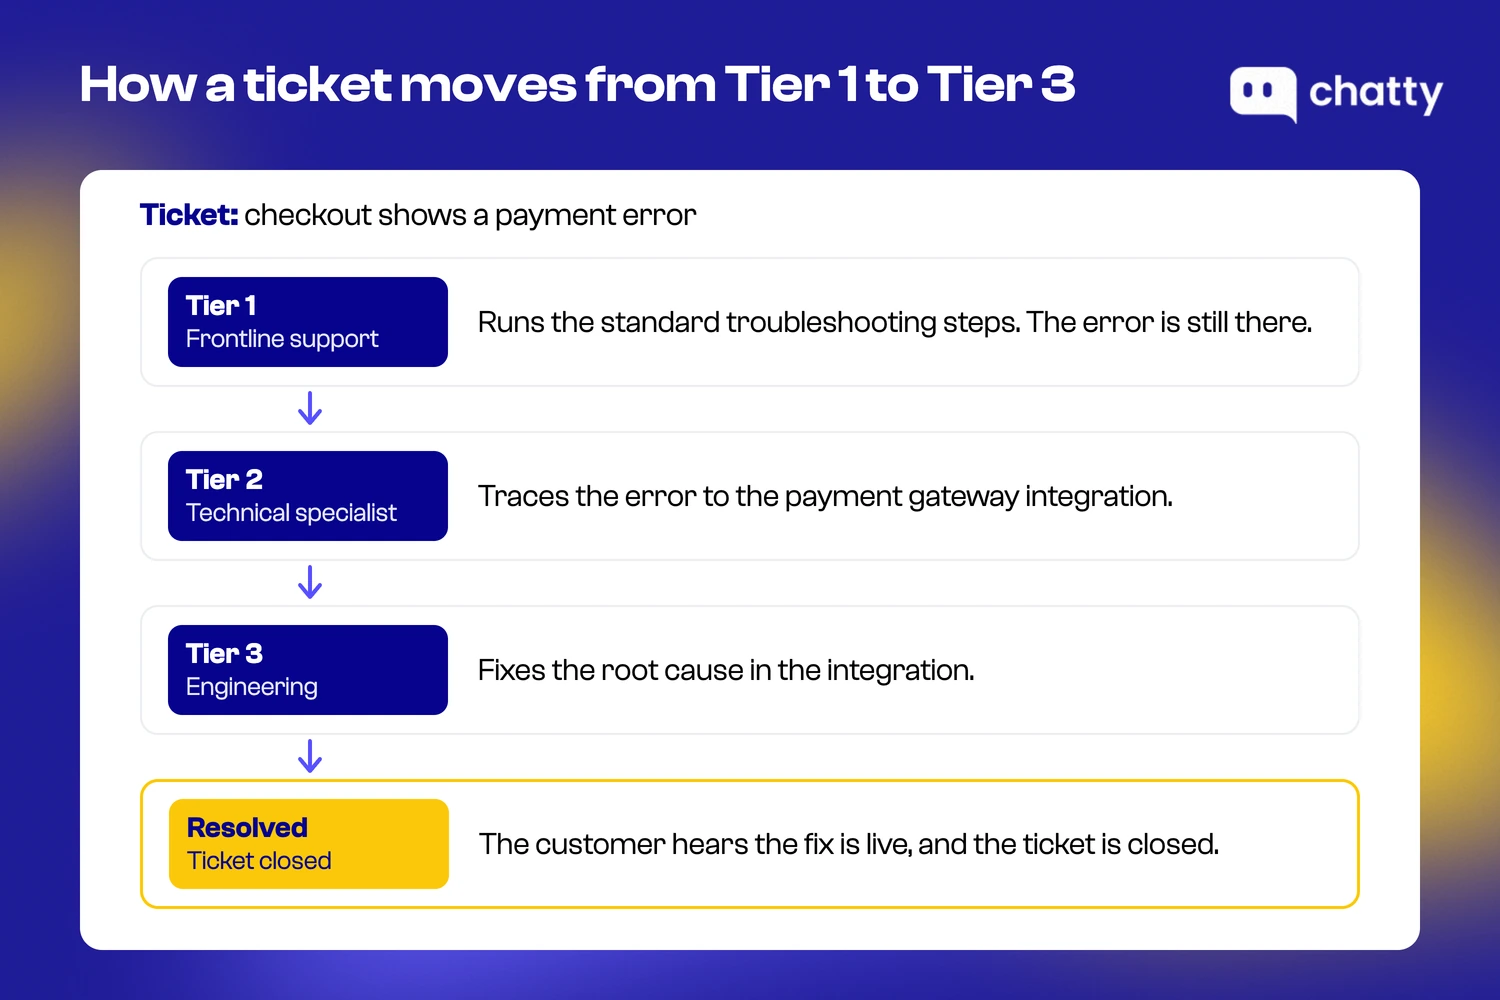
Escalation ensures that complex issues are routed to the right people efficiently, rather than lingering in the wrong queue.
Escalation is a normal part of how support teams work, not a sign of failure. The goal is simple: get the right person on the right problem as fast as possible.
When should a ticket be escalated?
A ticket should be escalated when:
- The issue requires deeper technical knowledge
- The problem affects multiple users or systems
- SLA deadlines are approaching
- The customer is highly frustrated or demanding a higher authority
- The request involves billing exceptions, security risks, or compliance
From experience, the costliest mistake is waiting too long. Agents often try to "solve it themselves" to avoid escalation, especially in teams where escalation feels like a performance flaw. That hesitation can turn a manageable issue into a reputational problem.
Why ticket escalation is important
Getting escalation right affects more than just one ticket. It shapes how customers see your brand, how efficiently your team operates, and how quickly minor problems turn into big ones.
For customer experience
Customers care about resolution speed and clarity, not about your internal tiers.
A smooth escalation process:
- Prevents repetitive explanations
- Reduces time-to-resolution
- Maintains confidence in your support team
When escalation is clumsy, customers feel abandoned. They have to repeat information and wait without updates, until frustration turns into an angry escalation of their own.
A technical fix can take 15 minutes while the customer's frustration lasts for days, because nobody kept them informed during the escalation.
For support team efficiency
Good escalation helps your agents as much as your customers.
Without clear escalation paths, frontline agents waste time on issues they can't solve. They dig through documentation, ping colleagues on Slack, and try workarounds that don't stick. Meanwhile, their queue piles up.
When agents know exactly when to escalate and exactly who to send it to, two things happen. They spend more time on tickets they can actually resolve. And the specialists who receive escalated tickets can focus on what they do best.
Risks of poor escalation management
When escalation breaks down, the damage spreads fast:
- SLA breaches pile up. Tickets sit in limbo while agents figure out who should handle them.
- Customer churn increases. Frustrated customers don't complain forever. They leave.
- Agent burnout rises. Nothing drains a support agent faster than struggling with problems they aren't equipped to solve.
- Minor issues become big ones. A simple bug report that should have gone to engineering on day one turns into a week-long complaint thread.
The worst scenario is a ticket escalated multiple times with no owner. Nobody feels responsible, because everyone assumes someone else is handling it.
Common reasons for ticket escalation
Not every tough ticket needs escalation. But certain situations almost always call for it. Here are the four most common triggers:
- Technical complexity. The issue goes beyond what your frontline agent knows. Think of a bug in a checkout app, a server-side error, or a theme conflict that needs a developer.
- SLA breaches. Your ticket is approaching its deadline or has already missed it. If the current agent isn't close to a fix, escalating gives someone with more resources time to solve it before the deadline.
- Customer urgency. Some customers are past the point of patience. They've been waiting too long, repeated their issue multiple times, or the problem is costing them money right now. Escalation here shows the customer that you take their situation seriously.
- Authority requirements. Large refunds, account-level security changes, contract exceptions: anything that involves bending the rules needs approval from a manager or specialized team. Your frontline agent simply can't say yes to these, no matter how skilled they are.
Types of ticket escalation
Escalation isn't one-size-fits-all. The type you use depends on why the ticket needs to move and where it needs to go.
Functional escalation
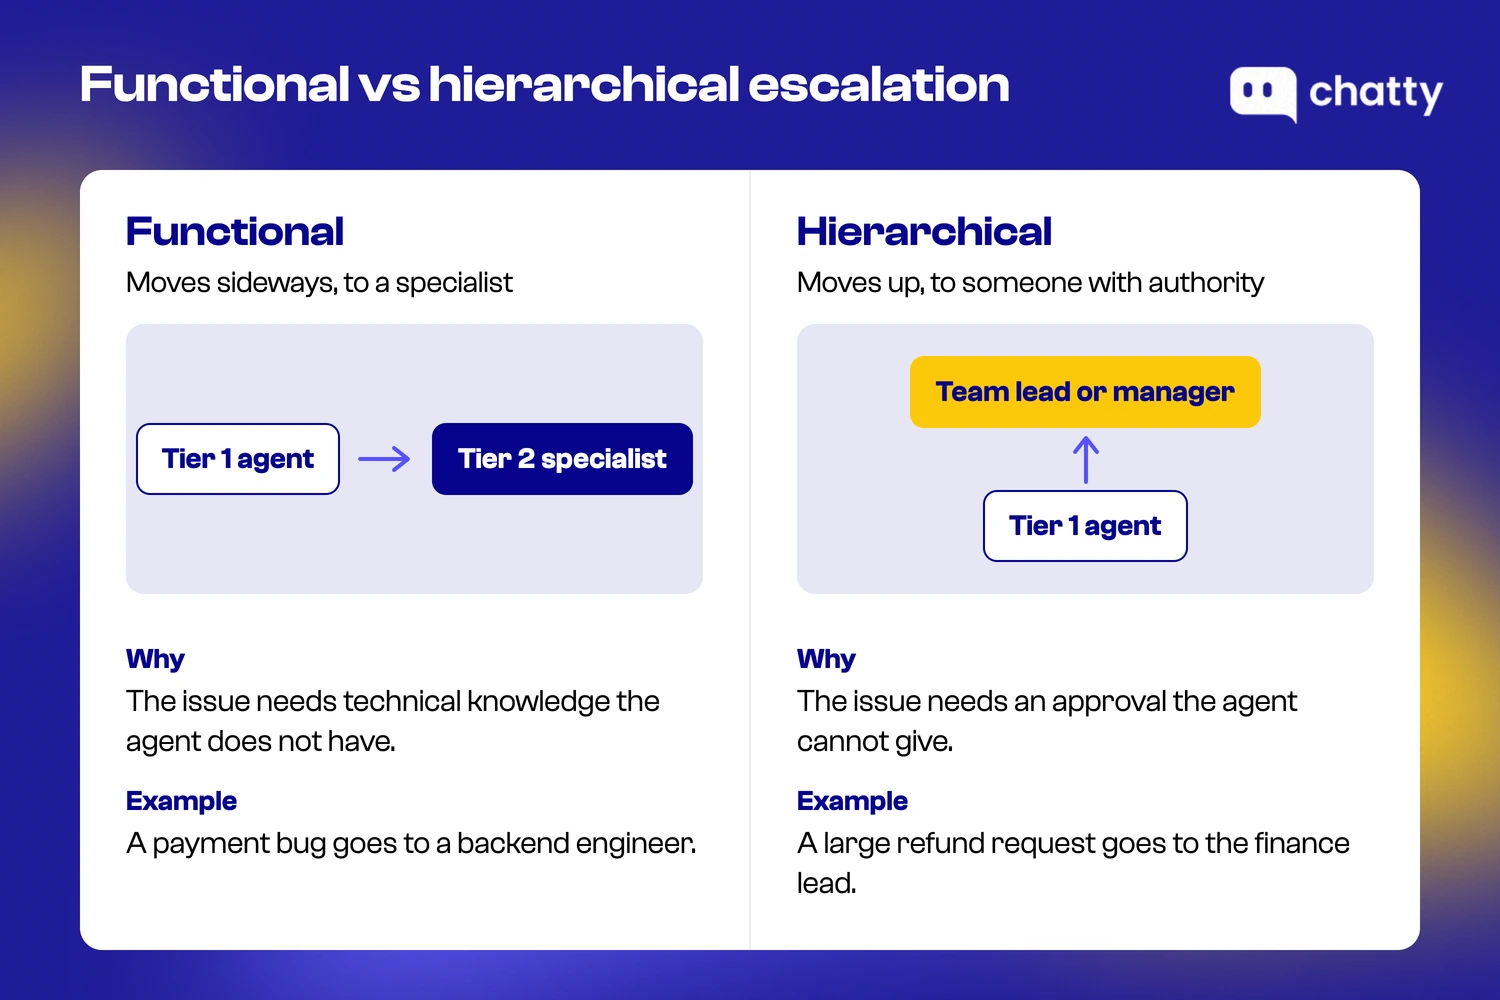
Functional escalation moves a ticket to someone with different or deeper expertise. It's a lateral move, not an upward one.
For example, a Tier 1 agent gets a ticket about a payment processing error. They've tried the standard troubleshooting steps, but the issue points to a problem with the payment gateway integration. That ticket needs to go to a technical specialist who understands how the integration works.
The key point is that functional escalation is about skill rather than authority. The agent isn't doing anything wrong, since they simply lack the specific knowledge to fix this particular problem.
Hierarchical escalation
Hierarchical escalation moves a ticket up the chain of command to someone with more authority or decision-making power.
This happens when the issue isn't technical. A customer wants a refund above the agent's limit, or threatens to cancel a subscription unless they get a discount.
A suspected security incident belongs here too, because someone senior needs to know about it right away.
The frontline agent might know exactly what the customer wants. They just can't authorize it.
Teams sometimes confuse the two types. They send a ticket to a manager when it needs a specialist, or to a developer when it needs an approval. Getting this distinction right saves everyone time.
Functional vs hierarchical escalation: a quick comparison
Automatic vs manual escalation
This is less about where the ticket goes and more about how it gets there.
Manual escalation means an agent decides to escalate based on their judgment. This works well when agents are experienced and escalation criteria are clear.
Automatic escalation means your helpdesk triggers the handoff based on predefined rules. Common rules include an SLA timer hitting a threshold, a ticket sitting unassigned too long, or keywords like "legal" or "security breach."
Most teams use a mix of both. Automatic rules catch the obvious cases. Manual escalation handles nuanced situations where human judgment matters.
How to escalate a support ticket effectively
Knowing when to escalate is only half the job. A sloppy handoff creates more problems than it solves, so the other half is doing it well. Here's a four-step process that keeps things clean:
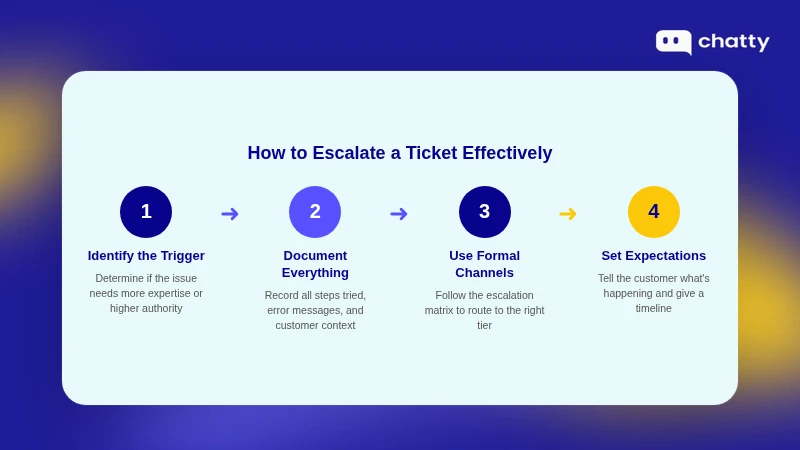
Step 1: Identify the trigger.
Before you hit the escalation button, ask one question: does this ticket need more knowledge or more authority?
- If the issue is technical and beyond your skill set → functional escalation. Route to the right specialist or next tier.
- If the issue requires a decision you're not authorized to make → hierarchical escalation. Send it to a manager or team lead.
Getting this right at the start prevents the ticket from bouncing between the wrong people.
Step 2: Document everything.
This is where most escalations fall apart. The ticket moves to a new person, but the context doesn't move with it.
Before escalating, make sure the ticket includes:
- A clear summary of the customer's issue
- Every troubleshooting step already tried
- Any error messages, screenshots, or logs the customer shared
- The customer's tone and urgency level
- How long the ticket has been open
Spend two extra minutes writing a solid internal note. It saves everyone thirty minutes on the other end.
Step 3: Use formal channels.
Don't escalate through Slack DMs or hallway conversations. Use your organization's defined escalation path.
Most teams have an escalation matrix that maps each ticket type to its destination. Technical issues go to Tier 2, billing exceptions go to the finance lead, and security concerns go to the security team.
Follow that matrix, and if your team doesn't have one yet, build one. Informal escalation leads to tickets getting lost, duplicated, or forgotten.
Step 4: Set clear expectations.
Once the ticket is escalated, tell the customer what's happening. Don't leave them in the dark.
A simple message works: "I've brought in a specialist who can help with this. You should hear from them by tomorrow afternoon."
If you don't know the exact timeline, say that honestly: "I've escalated this to our technical team. I don't have an exact timeframe yet, but I'll follow up with you by the end of the day."
Honest communication beats vague promises every time.
See more:
- Support ticket: definition, types, and workflow
- AI ticketing: use cases and how it works
- How to build a ticket triage system that scales
How to escalate a ticket in Chatty Helpdesk
In Chatty Helpdesk, escalation runs on four fields every ticket already has: a priority, an assignee, a status, and internal notes. Helpdesk is included on every Chatty plan, including Free, and opens from Helpdesk in the left navigation of the Chatty app. Here is how each part of the four-step process above maps to it:
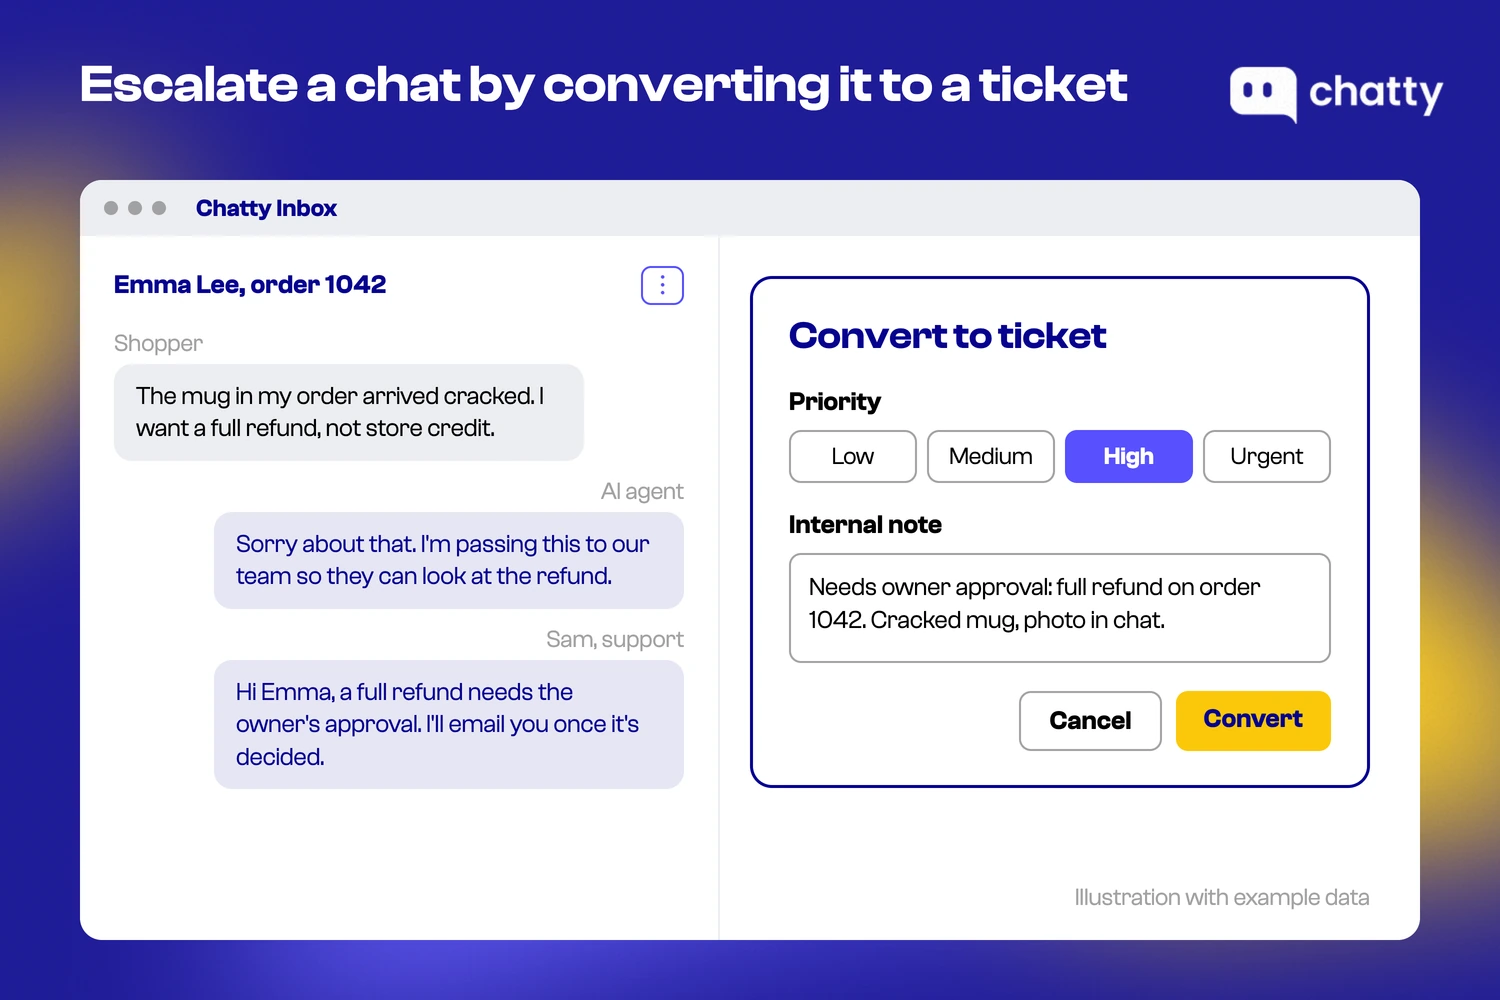
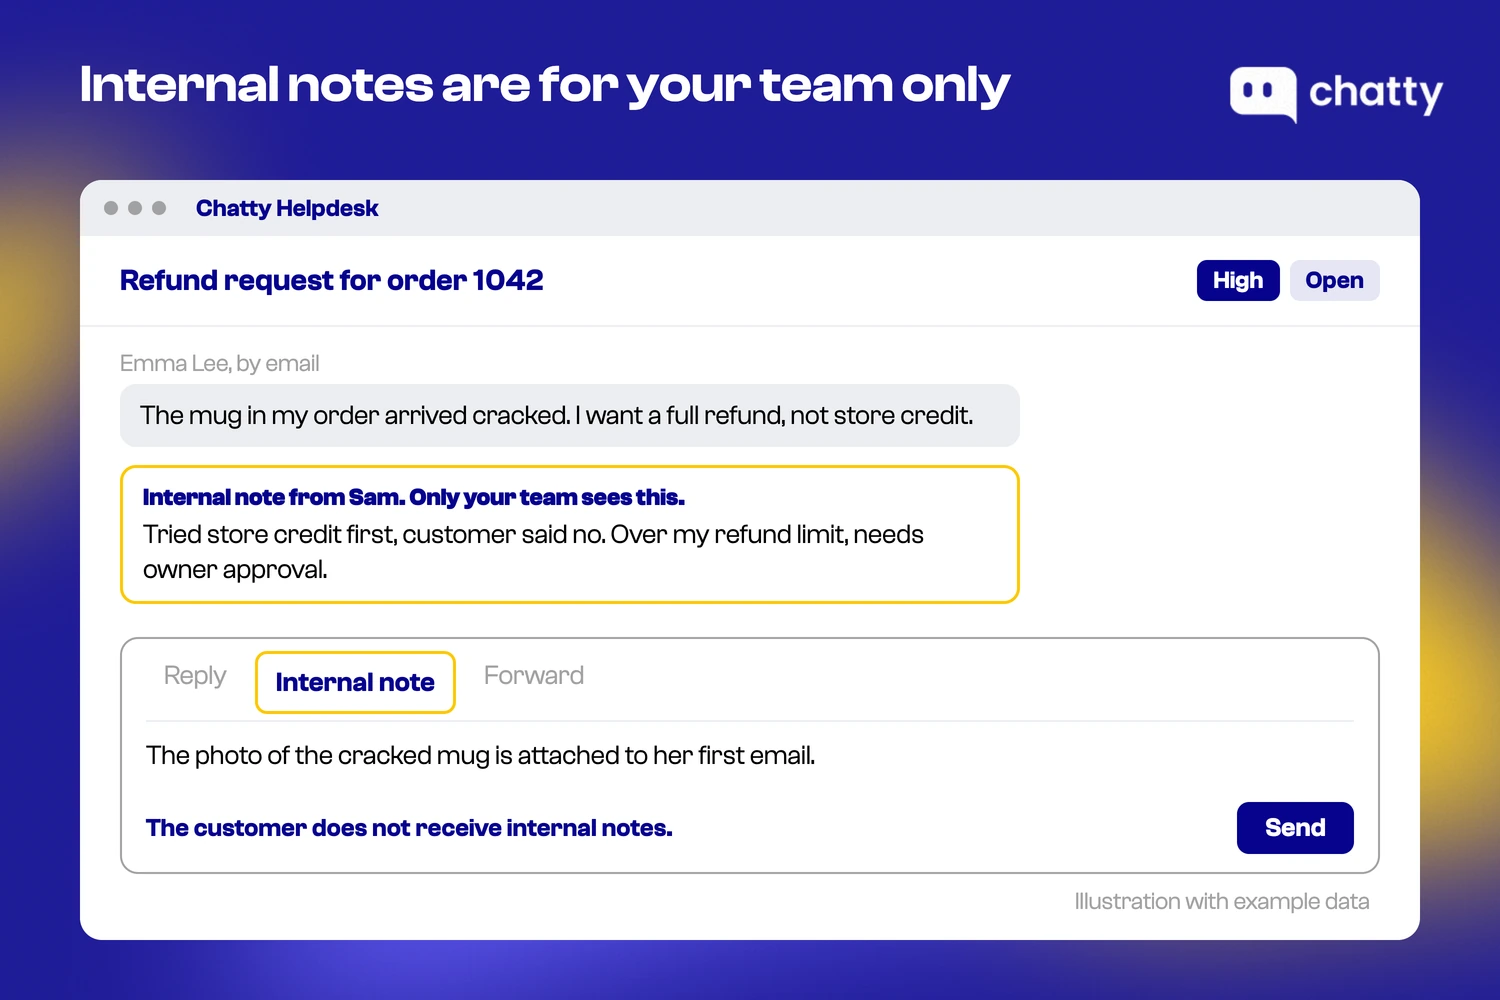
- Escalate a chat into a ticket. Sometimes a chat with your AI agent or a teammate turns into work that will outlast the conversation. Open it on desktop, click the vertical menu on the conversation header, and choose Convert to ticket. Set the priority and write the handoff in the Internal note field. Medium is preselected, and Urgent shows as Critical on the ticket. Replies then continue in Helpdesk, and they still reach the customer.
- Set the priority and the owner. The New ticket form asks for a priority (Low, Medium, High, or Critical) and an assignee, or you can leave it Unassigned. Use Critical and High for the triggers your team agreed on, so the person receiving the ticket knows to open it first.
- Document on the ticket, not in Slack. The Internal note tab keeps the note on the ticket, and the customer does not receive it. This is where the summary, the steps tried, and the customer's mood go.
- Bring in someone outside the app. The Forward tab sends the ticket to an email address you enter. Use it for a supplier, a carrier, or a finance contact who doesn't log in to Chatty.
- Keep the customer updated while you wait. Send delivers your reply and leaves the ticket open. Send and snooze replies and parks the ticket while you wait on the customer. Send and close replies and closes the ticket, which moves it to Resolved. Tickets move through Open, Pending, Snoozed, and Resolved, and the Assigned to me and Unassigned views show who owns what.
There's one limit to know before you build your process around it. Chatty Helpdesk has no SLA timers, automation rules, or macros, so it won't escalate a ticket on its own.
People apply the triggers in this guide, which suits a small Shopify team that escalates a handful of tickets a day. Teams that need rule-based auto-escalation should look at a larger helpdesk.
The full setup covers turning support email into tickets, creating tickets by hand, and the ticket views. Follow our step-by-step guide on how to manage customer support tickets in Shopify, or read the Helpdesk docs.
Best practices for managing ticket escalation
Ten practices keep escalation fast and predictable, from setting the criteria to learning from the data. Here they are:
1. Define clear escalation criteria
Your agents shouldn't have to guess when to escalate, so give them specific triggers. Three triggers make a good start:
- The ticket has been open for a full business day without progress
- The customer has replied more than three times without a resolution
- The issue involves a product area that needs Tier 2 knowledge
The more concrete the criteria, the fewer judgment calls agents have to make under pressure.
2. Separate escalation from failure
If agents feel like escalating means they've failed, they'll avoid it. They'll hold onto tickets too long, try fixes they're not qualified to attempt, and let situations worsen before asking for help.
Make it clear: escalation is a tool, not a punishment. The best agents escalate because they understand the limits of their role, not because they're bad at their job.
Build this into your team culture by celebrating smart escalations in team meetings as examples of good decision-making.
3. Use early triage to prevent late escalation
Many escalation problems start at intake. If tickets aren't categorized properly from the start, they land with the wrong agent and sit there until someone notices.
Build triage rules that catch complex tickets early. Keyword detection, customer tiers, and product categories can all route tickets to the right place early. That way, no agent wastes time on something they can't solve.
4. Preserve full context during handoff
When a ticket is escalated, the receiving agent should understand the whole situation without asking the customer a single repeated question. That means internal notes, attempted solutions, relevant screenshots, and a clear summary of where things stand.
If agents regularly hear "I already explained this to the last person," the handoff process needs work.
5. Align escalation rules with SLAs
Your escalation triggers should connect directly to your SLA commitments. If your SLA promises a response within four hours for high-priority tickets, your escalation rules should trigger well before that mark.
For example, if a high-priority ticket hasn't been picked up within two hours, automatically escalate it. Don't wait until the SLA is breached; by then, it's too late.
6. Standardize the escalation process
Every agent should follow the same escalation steps, documentation requirements, routing paths, and customer communication templates.
Without standardization, escalation quality depends entirely on which agent handles the ticket. Create an escalation checklist and include it in your workflow. Keep it simple enough that agents actually use it.
7. Enable cross-team collaboration
Some escalated tickets don't neatly fit a single team's territory. A customer reports a problem that involves both a billing issue and a technical bug. Who owns it?
Set up clear rules for cross-team tickets. Define who takes the lead, how teams communicate during a shared escalation, and who's responsible for updating the customer.
8. Automate where possible, not blindly
Automation is great for catching obvious escalation triggers. SLA timers, unassigned ticket alerts, and priority-based routing can all run automatically.
Still, some situations need human judgment. A ticket may meet an escalation trigger while the agent is five minutes away from resolving it.
Forcing an automatic handoff at that point creates more disruption than value. Use automation as a safety net, not a replacement for agent decision-making.
9. Monitor escalation quality, not just volume
Most teams track how many tickets get escalated. Fewer track whether those escalations were good.
Start measuring: Was the ticket routed to the right person on the first try? Did the receiving agent have enough context to work with? How long did it take to resolve after escalation?
A high bounce-back rate is a bigger warning sign than high escalation volume. If tickets keep getting rerouted because they went to the wrong team, your routing needs fixing.
10. Use escalation data to improve the system
Your escalation data shows where your support process is breaking down. If the same type of ticket keeps escalating, your Tier 1 agents may need better training on that topic. If one product area generates most escalations, that product may need better documentation or a fix.
Treat escalation patterns as diagnostic signals. Every recurring escalation points to something in your system that could work better.
Measuring the effectiveness of ticket escalation
You can't improve what you don't measure. And most teams only track one thing: how many tickets got escalated. That's a start, but it barely scratches the surface.
Key escalation metrics
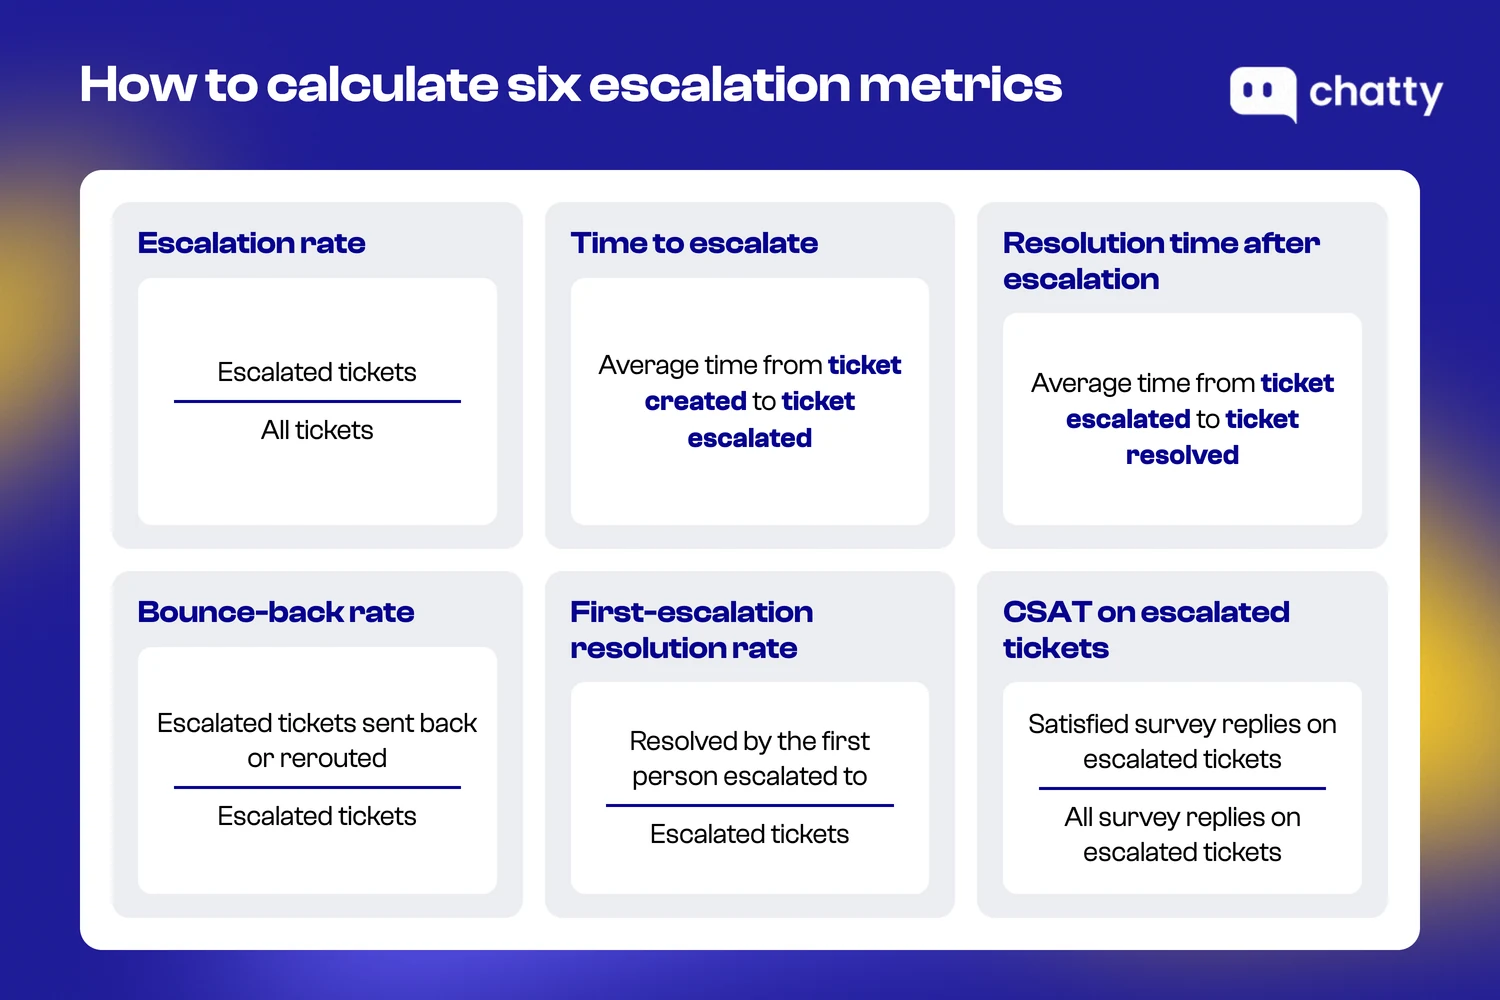
Five metrics show how well your escalations work:
- Escalation rate. The percentage of total tickets that get escalated. Track it month over month. If it keeps climbing, something upstream needs attention: either Tier 1 needs more training or triage is routing tickets incorrectly.
- Time to escalate. How long a ticket sits before getting escalated. If agents hold onto tickets for hours before passing them along, you're burning through SLA time.
- Resolution time after escalation. How long does it take to close a ticket after it's been escalated? If this number is high, the receiving team may be overloaded, undertrained, or getting tickets without enough context.
- Escalation bounce-back rate. How often does an escalated ticket get sent back or rerouted? This is your best indicator of routing accuracy. A high bounce-back rate indicates tickets are being sent to the wrong place.
- First-escalation resolution rate. The percentage of escalated tickets resolved by the first person they're sent to. If tickets bounce through three or four people before someone fixes them, your escalation paths need work.
Customer experience indicators
Metrics only tell part of the story. You also need to know how escalation feels from the customer's side.
- CSAT scores on escalated tickets. Compare satisfaction scores for escalated versus non-escalated tickets. A big gap signals friction that customers notice.
- Number of customer touches. How many times does the customer have to respond or repeat information during an escalation? Every additional touchpoint is a chance for frustration. Fewer is better.
- Response time gaps. Watch for dead zones, the periods when no one responds to the customer after escalation. Even a short gap can make a customer feel forgotten.
Using data to improve escalation rules
Look for patterns. When one product feature drives a lot of escalations, your knowledge base needs a better article on it. Sometimes your Tier 1 agents just need a quick training session instead.
Review your escalation triggers quarterly, because what made sense six months ago may no longer fit your product or team. SLA thresholds change, team skills evolve, and new product areas emerge.
Common mistakes in ticket escalation
Three mistakes come up again and again. Here's how to spot and fix each one:
Escalating too early or too late
Both extremes cause problems.
Escalate too early, and you overload Tier 2 and Tier 3 with tickets that Tier 1 could have handled. Specialists waste time on simple issues. Response times for genuinely complex tickets suffer.
Escalate too late, and the damage is already done: the SLA is breached and the customer is furious. The person receiving the ticket now has to fix both the original problem and the relationship.
The fix: clear escalation criteria with specific triggers. Don't leave it up to gut feeling. Remove the guesswork.
Losing context during handoff
This is one of the most common escalation mistakes and the one customers hate the most.
A customer explains their issue in detail. The first agent then escalates it with a vague note, "customer needs help with billing," and moves on.
The next agent asks the customer to explain everything again, and the customer loses patience.
Every handoff without proper context resets the customer's experience to zero. Fix this by making documentation a required step before escalation, rather than something agents do when they have time.
Build it into your workflow so agents can't escalate without four key fields: issue summary, steps attempted, current status, and customer sentiment.
Treating escalation as failure
When agents view escalation as an admission of defeat, they avoid it. They hold onto tickets they can't solve and try workarounds that make things worse. Then they wait until the situation is critical before asking for help.
The mindset shift is simple but essential: escalation means the agent recognized the right path forward and took action. That's reasonable judgment, not weakness.
Bottom line
Ticket escalation is simple, but it takes intention: get the right problem to the right person at the right time. Everything else (the processes, the automation, the metrics) exists to make that happen consistently.
The teams that handle escalation well share a few habits. They set clear criteria so agents don't guess, and they preserve context so customers don't repeat themselves.
They also track the right metrics so problems get caught early. Above all, they treat escalation as a normal part of support rather than a sign of failure.
If you run support for a Shopify store, write your triggers down first. Then use the priority, assignee, and internal notes in Chatty Helpdesk to apply them to every escalated ticket.
FAQ
Ticket escalation is the process of transferring a support ticket to a higher level of expertise or authority. It happens when the ticket can't be resolved at the current level.
Escalate a ticket when the fix needs knowledge the current agent doesn't have, or a decision they can't make. Escalate it too when the ticket is close to missing its response target. Act early, because holding a ticket too long is the costliest mistake.
Functional escalation moves a ticket to someone with deeper expertise. Hierarchical escalation moves it to someone with more authority.
Clear criteria, strong frontline training, proper triage, and updated knowledge bases reduce avoidable escalations.
Give the ticket a priority, an owner and a handoff note. In Chatty Helpdesk, you set the priority (Low, Medium, High or Critical) and the assignee when you create a ticket. Add context on the Internal note tab, and use the Forward tab to bring in an outside contact such as a supplier.
In Chatty, open the conversation on desktop, click the vertical menu on the conversation header and choose Convert to ticket. Set a priority and write an internal note so whoever picks up the ticket has the context. Replies then continue in Helpdesk and still reach the customer.
Include a one-line summary of the problem, the order number and every step already tried. Add anything the customer sent (photos, error messages), how upset they are, and what you already promised them. If the next person has to ask the customer a question you could have answered, the note was too short.