













Shopify has no built-in ticketing system. To manage customer support tickets in Shopify, add a helpdesk app that turns support emails and chats into tickets. Each ticket then has an owner, a priority and a status.
Shopify Inbox, the free chat app, lets you assign a store chat to a staff member and mark it Open or Closed. That works while almost every request starts and ends in a store chat. It stops working the day a customer emails [email protected] about a refund, because that email never reaches Inbox.
This guide shows what Shopify Inbox does today. Then it walks through six steps to run tickets in a helpdesk app, using Chatty Helpdesk as the example. Each step ends with the result you should see on screen.
- Shopify does not create tickets
Shopify Inbox gives chat conversations two statuses, Open and Closed, and lets you assign each chat to one staff member. It does not turn incoming emails into tickets and has no priority field.
- A ticket needs four things
Every ticket needs a subject, an owner, a priority and a status. Without those, "who is handling the refund for order 1042?" is answered by scrolling.
- Email is where tickets are lost
Turn on email-to-ticket before you build any other rule, because email is the channel a small team rarely watches in real time.
- Write down two rules before you invite the team
One rule for what each priority means and one for when a ticket is Resolved. Software holds the fields, but the team has to agree on what goes in them.
- Chatty Helpdesk is on every plan, including Free
It covers email-to-ticket, manual tickets, priority, assignees, views, internal notes and chat-to-ticket in the same app as your store chat.
Shopify Inbox vs a helpdesk app for ticket work
The table below lists the ticket jobs a small Shopify team does every day and shows which tool handles each one. Shopify Inbox facts below come from help.shopify.com, checked on 7 October 2026. Chatty facts come from the Chatty Helpdesk docs.
| Ticket job | Shopify Inbox | Chatty Helpdesk |
|---|---|---|
| Turn emails sent to your support address into tickets | No. Inbox handles store chat. Replies can go to a shopper's email after they leave the store | Yes, per email address, with Helpdesk ticket mode |
| Create a ticket by hand (phone call, note from the warehouse) | No | Yes, channel Manual |
| Ticket number and subject | No, a conversation with the customer's name | Yes |
| Priority | No | Low, Medium, High, Critical |
| Status | Open, Closed | Open, Pending, Snoozed, Resolved, plus Spam and Trash |
| Assign to a teammate | Yes, one staff member per chat | Yes, an assignee or Unassigned |
| Private notes for staff | On the customer profile | Internal note on the ticket |
| Turn a chat into a ticket | Not applicable | Yes, from the desktop app |
| Price | Free app | Helpdesk included on every Chatty plan, Free plan available |
If every row you care about says "Yes" on the left, keep Shopify Inbox. If you nodded at the first row, keep reading.
Does Shopify have a built-in ticketing system?
No. Shopify's own support tool is Shopify Inbox, a free app built around chats from your online store. Its help center says conversations have "a status of either Open or Closed" (Shopify Help Center, checked 7 October 2026).
You can assign a chat to one staff member who has the online store chat permission. When a customer leaves your store, Inbox sends your reply to their email address if they gave one.
That email reply is useful, and it is also where people get confused. Inbox can send a chat reply by email, but it does not receive the emails customers send to your support address.
The Inbox docs also mention no tickets, no ticket numbers and no priority. Staff notes live on the customer profile rather than on the conversation.
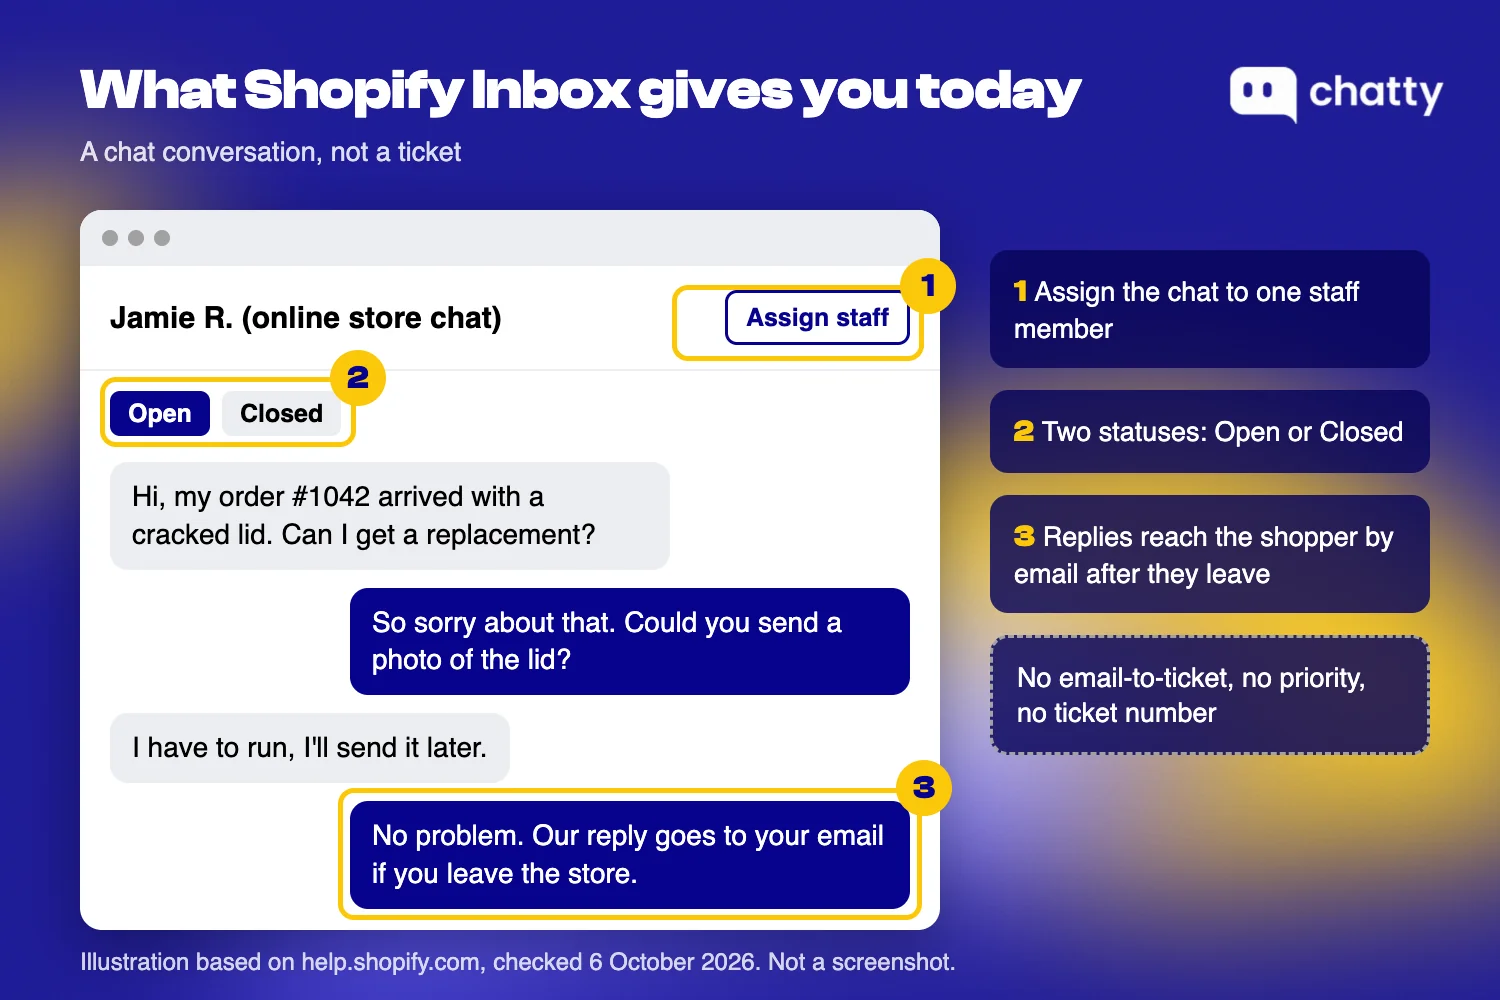
So a store with a support email on its contact page already runs two queues: Inbox chats and Gmail or Outlook emails. A ticketing setup joins them.
Still deciding whether you need a helpdesk at all? Our guide on helpdesk vs live chat covers where a chat should become a ticket.
What do you need before you set up tickets?
You need three things in place: a helpdesk app on your store, your support email connected to it, and your teammates invited. The steps below use Chatty Helpdesk, which opens from Helpdesk in the left navigation of the Chatty app.
Check these before Step 1:
- Your support email is connected to Chatty. Chatty receives email through forwarding from Gmail, Outlook, Zoho, Hostinger, Amazon SES and other providers. The email channel guide has the steps for each one.
- Your teammates have seats. Seats include the admin. The Free plan has 1 seat, Basic 5, Pro 10, and Plus has no limit, according to the Chatty Team docs. A solo founder can run every step on Free. Assigning tickets to other people needs a paid plan.
- Each teammate's role can view tickets. Helpdesk only appears for roles that can view tickets.
Step 1: How do you turn customer emails into tickets in Shopify?
Turn on Helpdesk ticket mode for your support email address. Every email that arrives after that becomes a ticket instead of a chat conversation. The switch is set per address, so you can send support@ to Helpdesk and leave another address as a normal conversation.
- Go to Settings > Channels > Email.
- Open the email address, for example [email protected].
- Turn on Helpdesk ticket mode. The switch reads "Create a Helpdesk ticket instead of a conversation for incoming email." It saves as soon as you switch it.
Expected result: Email that arrives after this becomes a Helpdesk ticket. It does not open as an Inbox conversation.
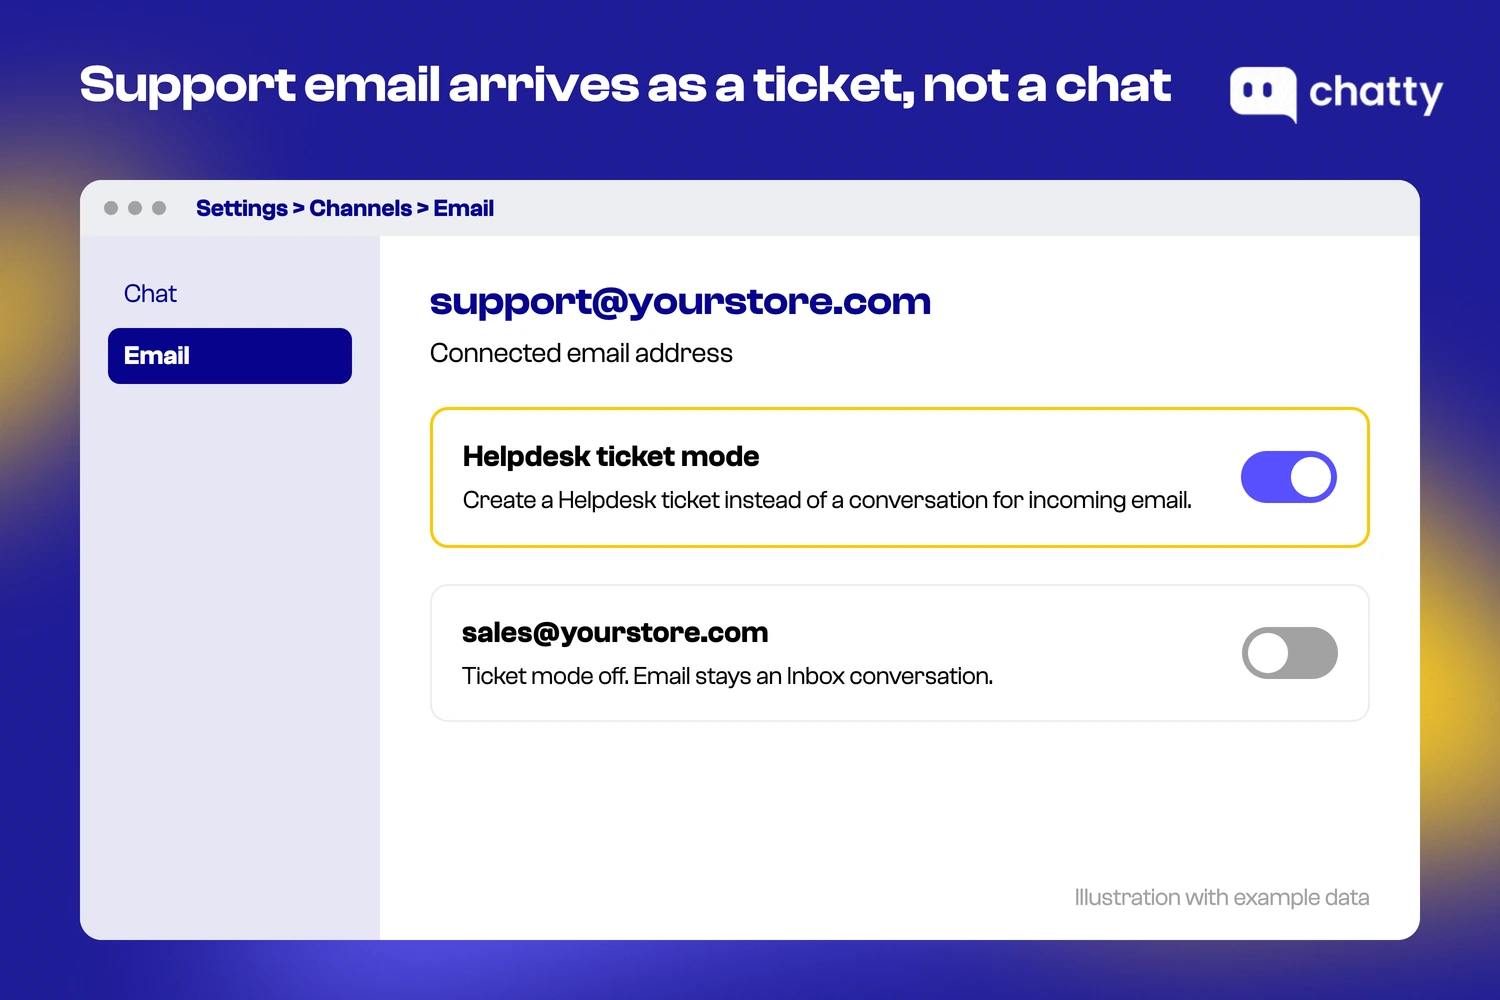
Email already sitting in Inbox stays a conversation, because the switch only changes email that arrives after you turn it on. Pick a quiet hour to switch, and tell the team which queue to watch from then on. Full details are in the Helpdesk email docs.
Step 2: How do you create a ticket by hand?
Click New ticket in Helpdesk and fill in the subject, customer email, channel, priority, first message and assignee. Use it for requests that reach you outside your connected channels, such as a phone call or a note from the warehouse.
- In Helpdesk, open Inbox and click New ticket.
- Fill Subject. Example: Refund request for order 1042.
- Fill Customer email.
- Choose Channel: Email or Manual. Pick Manual for a phone call.
- Set Priority: Low, Medium, High or Critical.
- Fill Body with the first message. Example: Customer called, the lid on order 1042 arrived cracked, wants a replacement.
- Choose Assignee, or leave it Unassigned.
- Click Create ticket.
Expected result: Helpdesk confirms "Ticket created." The new ticket opens in Inbox.
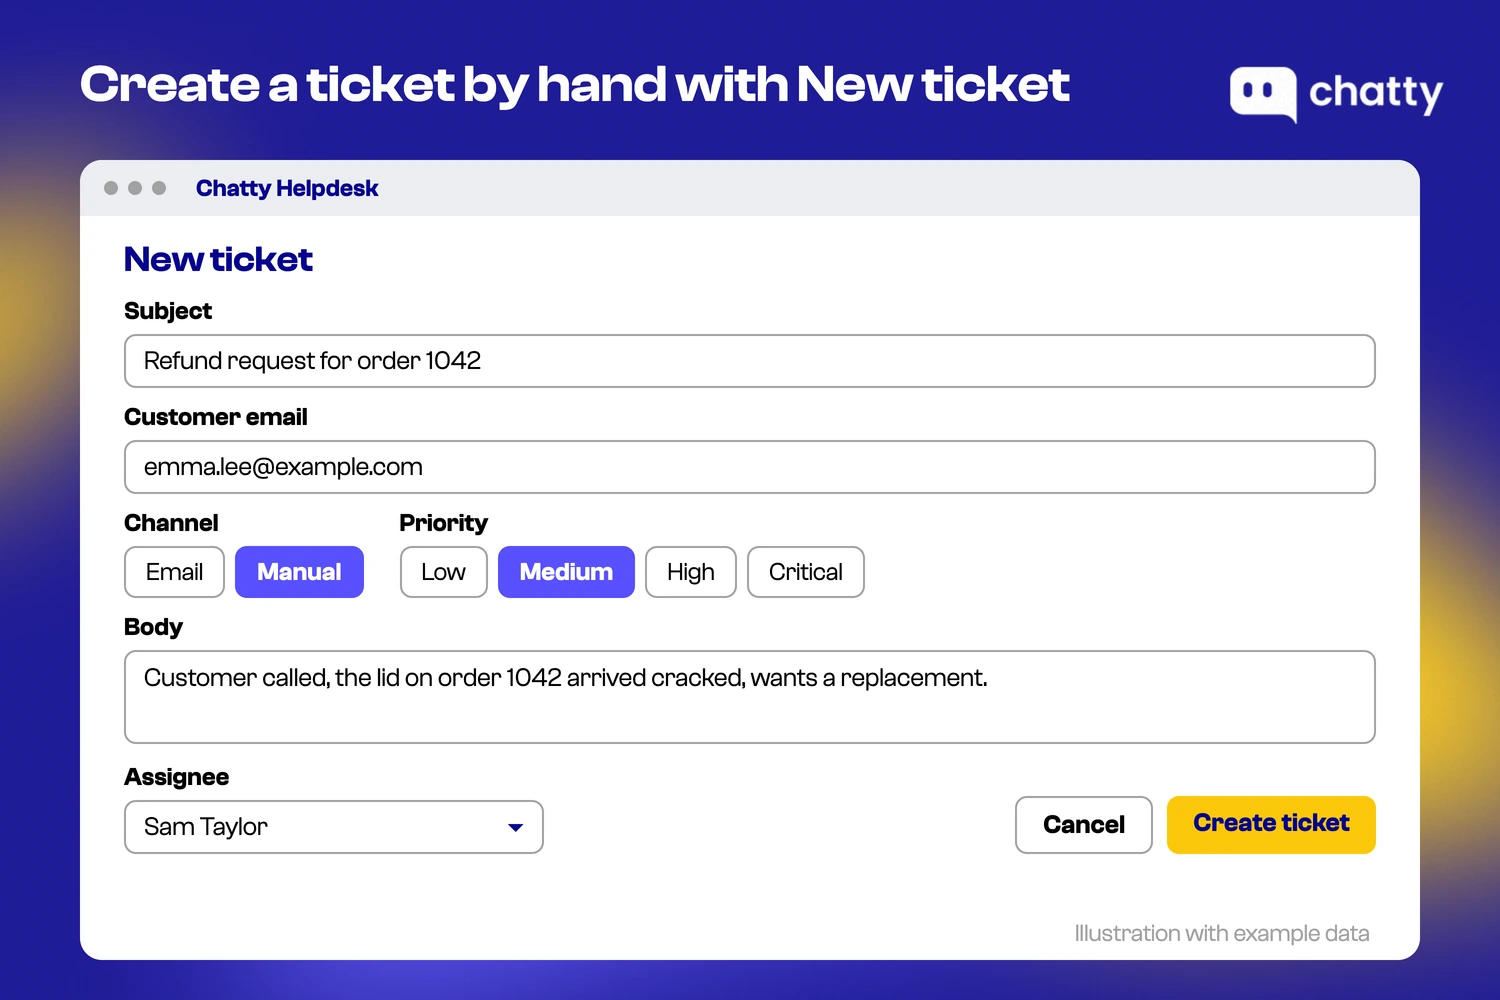
Put the order number in the subject every time. When a customer writes back three days later, the order number is what your teammate will search for.
Step 3: How do you set priority and assign a ticket to a team member?
Set the priority and pick the assignee in the ticket form when you create the ticket. A converted chat gets its priority in the Convert window (Step 6). Priority tells the team what to open first, and the assignee tells everyone else to leave it alone.
Two habits keep this clean:
- Assign at creation, not later. A ticket created as Unassigned waits for someone to notice it. If you know who handles refunds, pick that person in the form.
- Use Medium as the default. Keep High and Critical for the cases in your priority rules below. If half the queue is High, the label stops meaning anything.
Live chats that stay in Inbox can be assigned too. Open the conversation, go to Assignee in the conversation details, click Assign and pick a team member, as the Team docs describe.
Step 4: How do you see your queue, open tickets and closed tickets?
Open Inbox in Helpdesk, pick a view (All, Assigned to me or Unassigned), then pick a status. The status filter has All, Open, Pending, Snoozed, Resolved, Spam and Trash.
- Open Helpdesk.
- Click Inbox.
- Choose All, Assigned to me or Unassigned.
- Choose a status.
Expected result: The list shows tickets in that view and status.
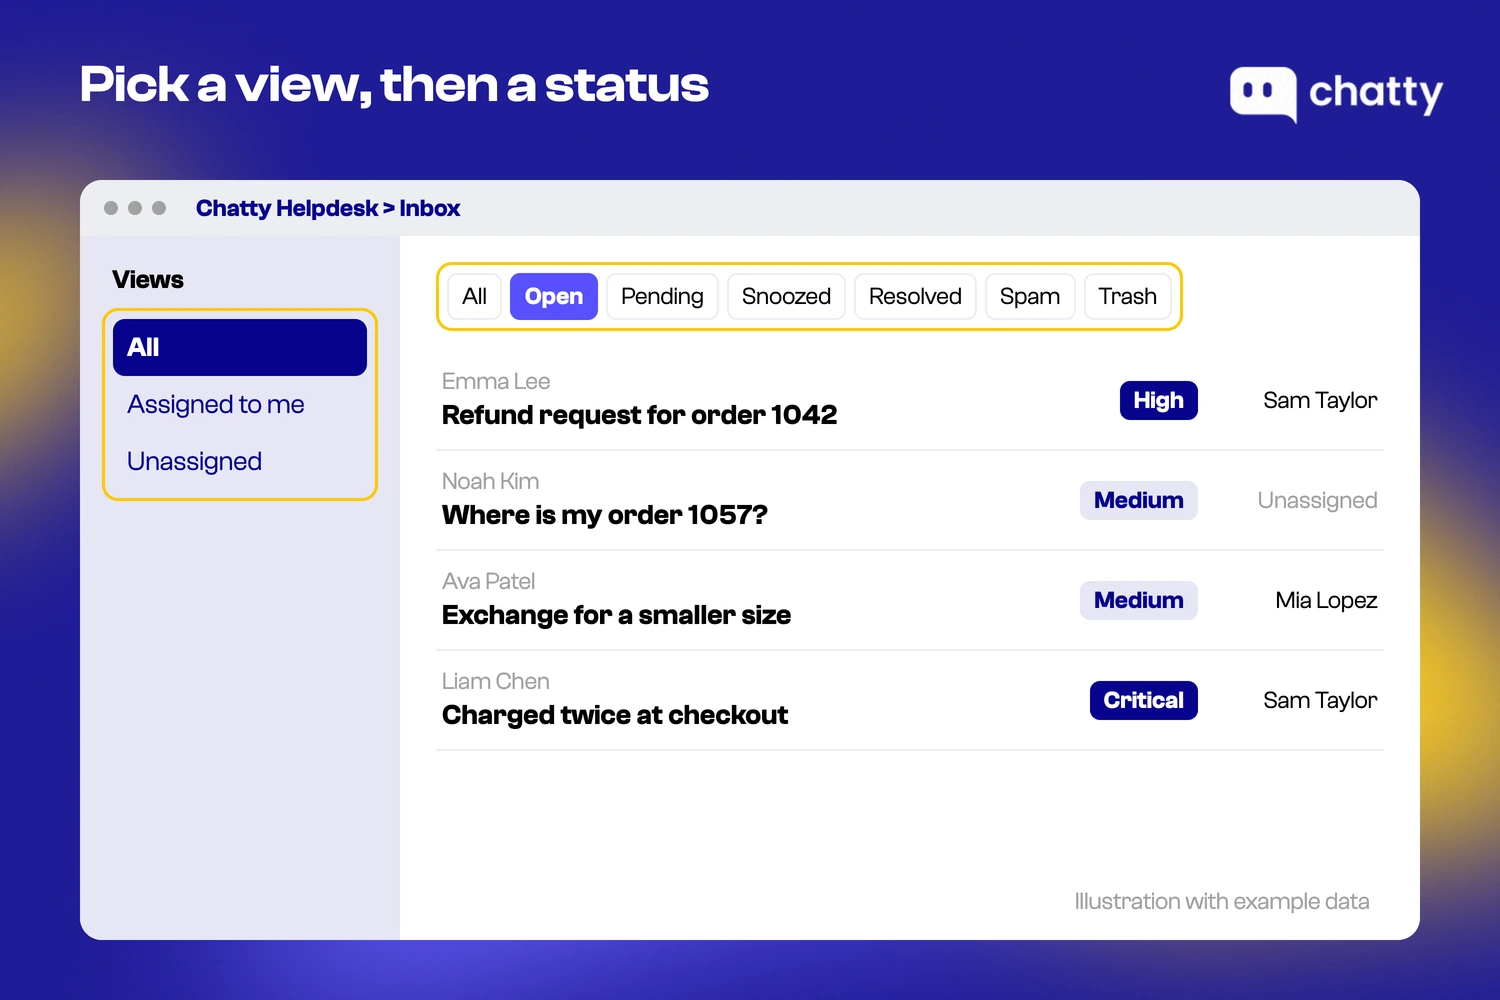
Closed tickets live under Resolved. That is the closed list, and it is where you look when a customer says "I already wrote to you about this."
The two views a small team uses most are Unassigned (work nobody owns yet) and Assigned to me (your own list). Start each shift with Unassigned. If it is empty, the rest of the queue has an owner.
Step 5: How do you reply, close, snooze or leave an internal note?
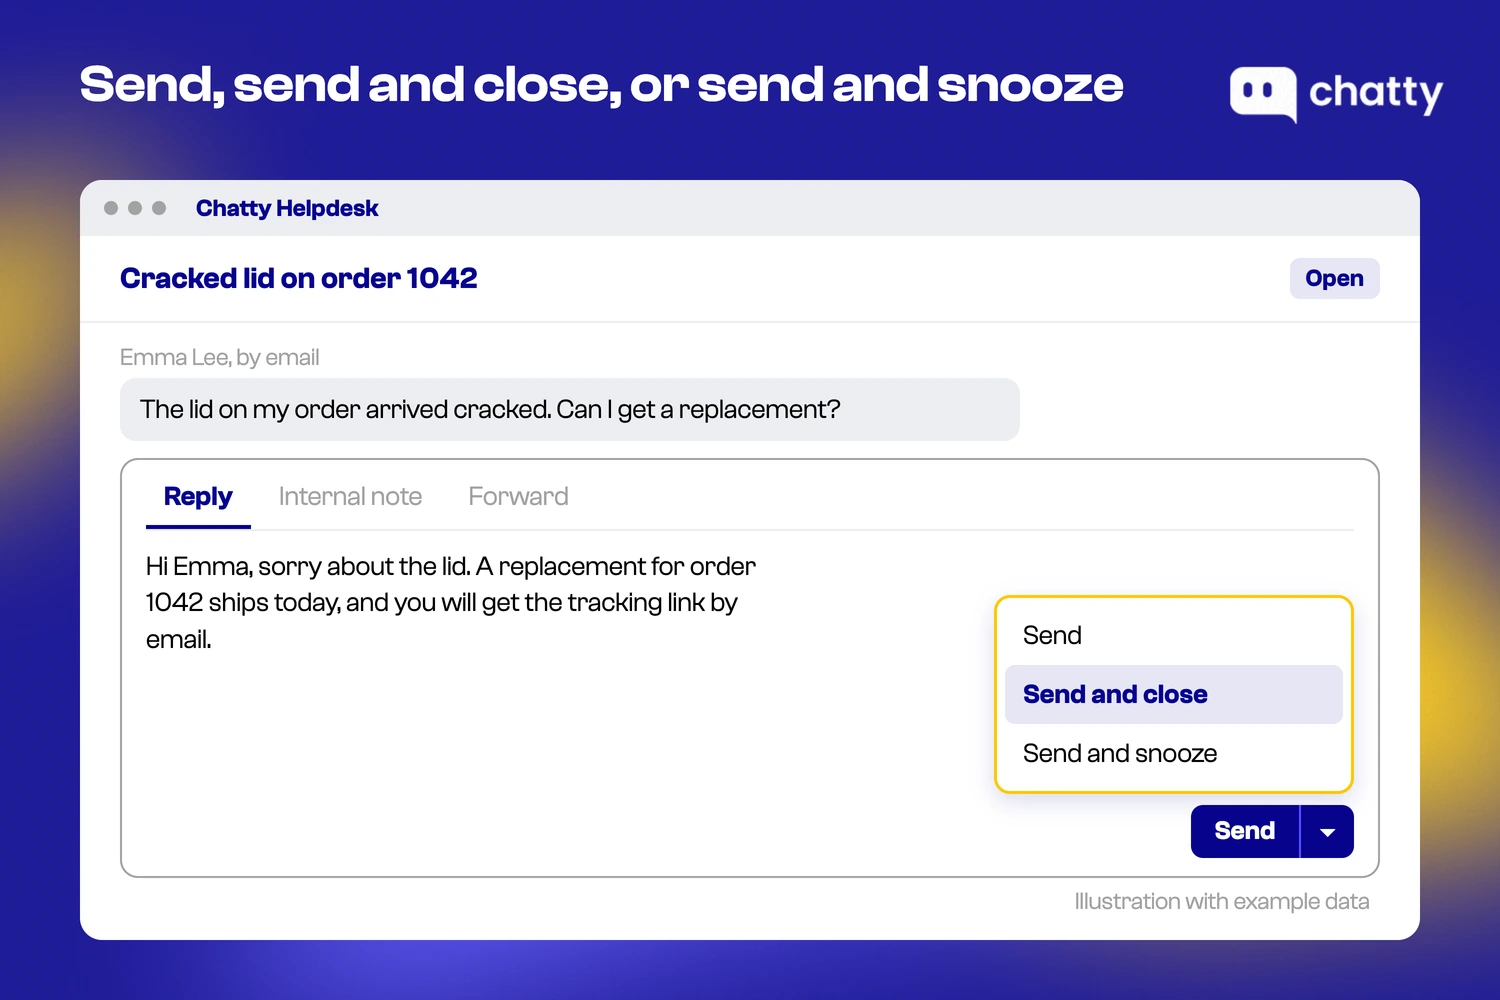
Open the ticket and write on the Reply tab. Send keeps the ticket open, Send and close replies and closes it, and Send and snooze replies and snoozes it. Use the Internal note tab for anything the customer should not see.
To reply:
- Open the ticket in Inbox.
- Stay on the Reply tab.
- Write the reply.
- Click Send, or open the send menu and choose Send and close or Send and snooze.
Expected result: The customer receives the reply. Send leaves the ticket open.
To leave an internal note:
- Open the ticket.
- Open the Internal note tab.
- Write the note and send it.
Expected result: The note stays on the ticket. The customer does not receive it.
Need someone outside the app, such as your supplier, to see the thread? Open the Forward tab, enter the address and click Forward. The Reply docs cover all three tabs.
Pick the ending on purpose. Use Send and close when the answer finishes the job ("Your refund is on its way").
Use Send and snooze when you are waiting on the customer, such as for a photo of the damage. The ticket then leaves the Open list without being marked Resolved.
Step 6: How do you turn a live chat into a ticket?
Open the chat in Inbox, click the vertical menu on the conversation header and choose Convert to ticket. Do this when a chat turns into longer work, such as a return, a replacement or anything waiting on the warehouse.
- Open the conversation in Inbox.
- Click the vertical menu on the conversation header.
- Click Convert to ticket.
- Set Priority. Medium is already selected. The choices are Low, Medium, High and Urgent.
- Fill Internal note if your team needs context. Example: Customer asked for a refund on order 1042.
- Click Convert.
Expected result: A banner reads "This conversation has been converted to a ticket. Replies are handled in Helpdesk." The button shows View ticket plus the ticket number, and the reply box in Inbox closes. A reply you write on that ticket still reaches the customer.
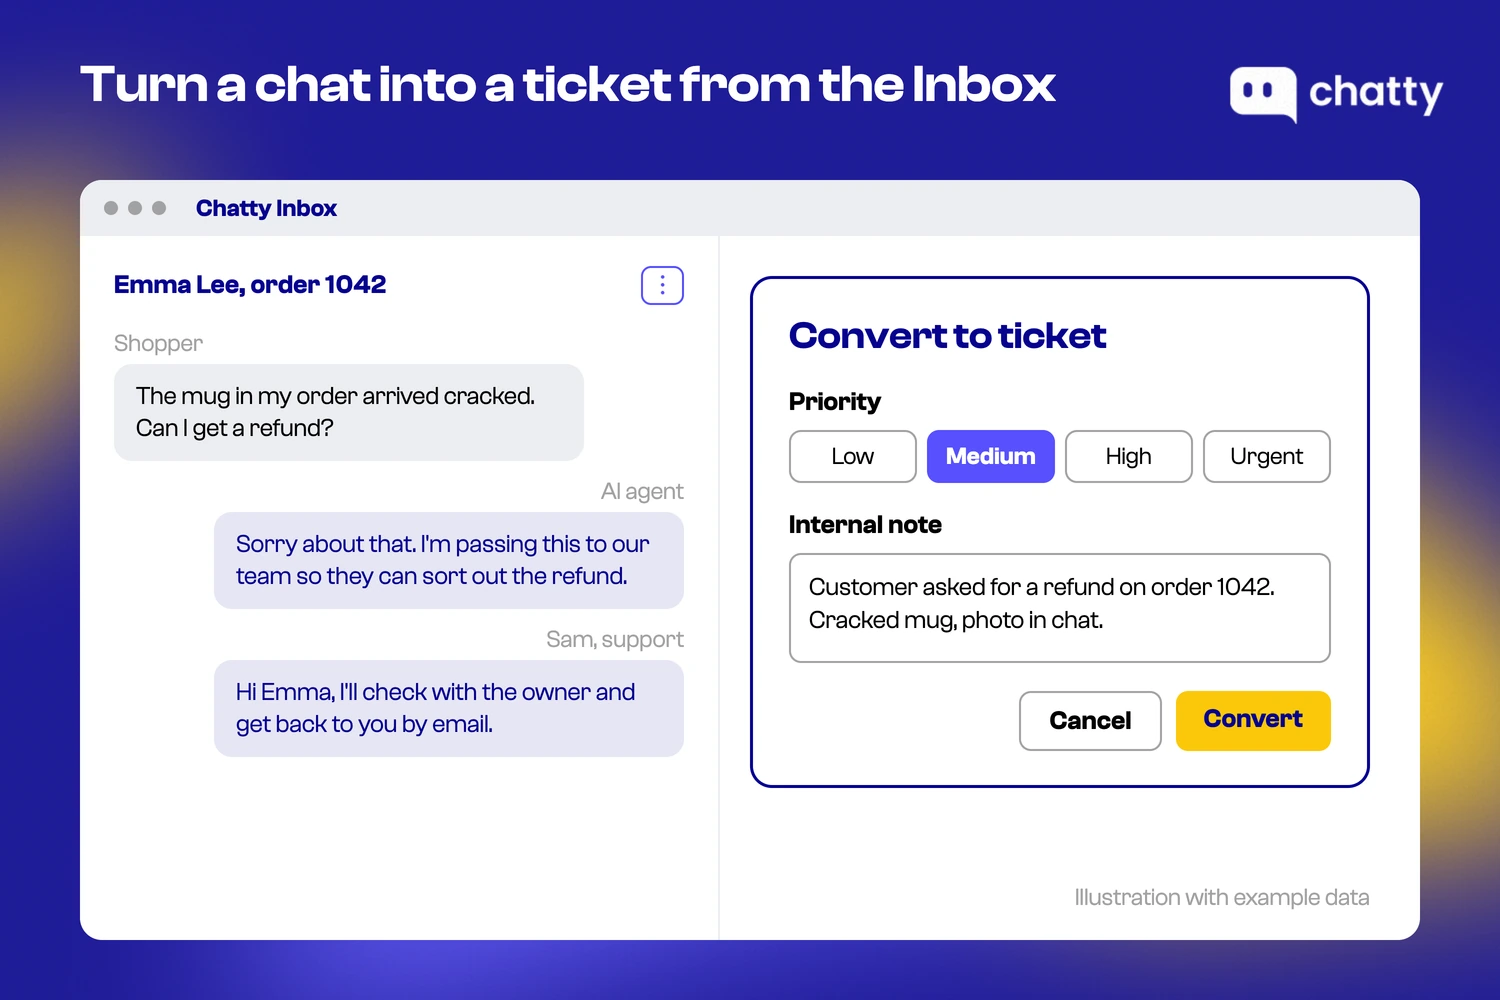
Urgent in this window is the same priority as Critical, and the Helpdesk ticket shows it as Critical.
Converting works from the desktop app only, because the phone app does not have the header menu yet. The steps are in the chat-to-ticket docs.
This step is where an AI chat agent and a helpdesk meet. Sometimes the AI agent or a teammate cannot finish a request inside the chat. Converting gives it a ticket number and a priority, and the internal note tells the next person what the customer said.
Our guide to ticket escalation covers what to write in that handoff note.
What priority and status rules should a small Shopify team use?
Write one line per priority and one line per status, pin it where the team works, and review it once a month. The fields only help if everyone fills them the same way. Here is a starting set for a store with one to five people on support:
| Priority | Use it for | First reply target (team agreement) |
|---|---|---|
| Critical | Checkout or payment broken, a wrong charge, a safety issue, a large wholesale order at risk | Within 1 hour, during opening hours |
| High | Order not arrived past its delivery date, damaged or wrong item, a customer who has written twice | Same working day |
| Medium | Returns, exchanges, address changes before shipping, product questions by email | Within 1 working day |
| Low | Feedback, partnership pitches, "do you plan to restock" | Within 3 working days |
The targets in the last column are a promise your team makes to itself. Set them from what you can actually staff, then tighten them. Our guide to customer service SLAs explains how to pick numbers you can keep.
Statuses need the same kind of agreement. A simple version:
- Open: the next move is ours.
- Pending: waiting on someone inside the business, such as the warehouse or a supplier.
- Snoozed: waiting on the customer, such as a photo, a return parcel or a reply. Send and snooze puts it here.
- Resolved: the customer has what they asked for. A refund that is approved but not yet sent is not Resolved.
One rule ties it together: every ticket that is not Resolved has an assignee. If you want a fuller method for sorting incoming work, read how to build a ticket triage system.
When is Shopify Inbox enough, and when do you need a bigger helpdesk?
Shopify Inbox is enough when store chat is your only channel and one or two people answer it. Add a helpdesk once email requests slip, two people answer the same customer, or nobody can say which refunds are still open.
Chatty Helpdesk fits a small or mid-sized Shopify store that wants AI chat and email tickets in one app. It is included on every plan, including Free.
Chatty Helpdesk has no SLA timers, macros, automation rules or helpdesk reports. Tickets come only from email, manual entry or a converted chat. If your team needs those features, a larger helpdesk fits better, and our roundup of AI helpdesk software compares the options.
Start with email, then add the rules
The fastest win is Step 1. Turn on Helpdesk ticket mode for the address customers already email. Requests that used to wait in a personal inbox then get a subject, a status and a place in the queue.
After a week, look at what landed there and write your priority and status rules from real tickets rather than guesses.
If you want the background on what a ticket should hold, start with what a support ticket is.
Frequently asked questions
No. Shopify Inbox, a free chat app, lets you assign a store chat to a staff member and mark it Open or Closed.
It does not create tickets, set priorities or receive emails sent to your support address. To manage tickets, add a helpdesk app such as Chatty Helpdesk.
Connect your support email to a helpdesk app that supports email-to-ticket. In Chatty, connect the address under Settings > Channels > Email, open it, and turn on Helpdesk ticket mode. Every email that arrives after that becomes a Helpdesk ticket, while email already in the inbox stays a conversation.
In Shopify Inbox, open the chat and assign it to a staff member who has the online store chat permission. In Chatty, choose an Assignee when you create a ticket, or assign a live chat from Assignee in the conversation details. Then work from the Assigned to me and Unassigned views so every request has one owner.
Shopify Inbox puts staff notes on the customer profile, not inside the conversation. In Chatty Helpdesk, open the ticket, switch to the Internal note tab and send the note. It stays on the ticket and the customer does not receive it.
Yes. Chatty includes Helpdesk on every plan, including Free, with email-to-ticket, manual tickets, priority, assignees and internal notes. The Free plan has one seat, so assigning tickets to other teammates needs Basic (5 seats) or a higher plan.
Not in Shopify Inbox. In Chatty, open the chat on desktop, click the vertical menu on the conversation header and choose Convert to ticket. Set a priority, add an internal note if needed, then click Convert, and replies continue in Helpdesk.
Use four levels: Critical for broken checkout or wrong charges, and High for late, damaged or wrong orders. Medium covers returns and product questions, and Low covers feedback. Make Medium the default so High still stands out, and define each level in one sentence the team can see.